Redis: How to Increase File Descriptor Limits

Tags: November 25, 2016 8:06 PM
1 comments

Problem

When you run redis server it complains can not set maximum open files because it has reached the OS max file descriptor limits. Here is the sample output.

$ ./bin/redis-server
28436:C 25 Nov 20:10:03.978 # Warning: no config file specified, using the default config. In order to specify a config file use ./bin/redis-server /path/to/redis.conf
28436:M 25 Nov 20:10:03.979 # You requested maxclients of 10000 requiring at least 10032 max file descriptors.
28436:M 25 Nov 20:10:03.979 # Server can't set maximum open files to 10032 because of OS error: Operation not permitted.
28436:M 25 Nov 20:10:03.979 # Current maximum open files is 4096. maxclients has been reduced to 4064 to compensate for low ulimit. If you need higher maxclients increase 'ulimit -n'.
[...CUT...]

When you try to increase the maximum file descriptor using ulimit as root by issuing sudo it returns an error.

$ sudo ulimit -n 65000
sudo: ulimit: command not found

Wow, WTF is that? ulimit is a shell built so giving sudo an instruction to run a command called ulimit will not work. It will the same as statement below.
Share on Facebook Twitter

How to Fix No Sound After Mute and Unmute on XFCE

Tags: October 7, 2016 7:36 PM
2 comments

Problem

There is no sound after doing mute then unmute on XFCE 4 Ubuntu 14.04.

Solution

Try running amixer command to see the status of the Master sound.

$ amixer get Master
Simple mixer control 'Master',0
  Capabilities: pvolume pswitch pswitch-joined
  Playback channels: Front Left - Front Right
  Limits: Playback 0 - 65536
  Mono:
  Front Left: Playback 65536 [100%] [off]
  Front Right: Playback 65536 [100%] [off]

In above result the status of Front Left and Front Right is [off]. Meaning it is still muted even has been unmuted from the XFCE panel. Try to toggle the switch to make it [on].

Share on Facebook Twitter

How to Extract Specific Directory from Tarball

Tags: September 24, 2016 9:30 PM
0 comments

Problem

We have huge file of gzipped tarball and we want to extract only specific directory from the tarball.

Solution

Make sure the pattern we want to extract by searching it first. As an example we want to extract directory named johndoe-website, but we did not know the full pattern of the directory.

$ tar tvf the-archive.tar.gz | grep johndoe-website
home/sites/clients/johndoe-website/javascripts/main.js
home/sites/clients/johndoe-website/styles/main.css
home/sites/clients/johndoe-website/index.html
From the output above we knew that the pattern of the directory is home/sites/clients/johndoe-website. Command below will extract johndoe-website from the archive and strip the 3 leading directories.
$ tar xvf the-archive.tar.gz --strip-components=3 -C /destination/path home/sites/clients/johndoe-website
Command above works in GNU Tar and BSD Tar (Mac OS X).

Share on Facebook Twitter

Quickest Way: Using STDIN and Pipe to Copy SSH Public Key to Server

Tags: July 27, 2016 8:13 PM
0 comments

Goal

Copy SSH public key to another machine without using external tools such as ssh-copy-id - Only pure shell built-in or at least standard commands.

Solution

The solution is using shell STDIN and PIPE it to ssh.

$ cat ~/.ssh/id_rsa.pub | ssh user@hostname 'cat >> .ssh/authorized_keys -'
The quote for the ssh arguments is important because without it the redirection will goes to your local machine instead of remote machine. The "-" at the last of cat command on the remote indicate it reads the input from STDIN.

Reference

Share on Facebook Twitter

Expose Port Inside Running Container on Docker Toolbox for Mac

Tags: July 20, 2016 11:05 PM
0 comments

Problem

Docker only allows to define port that need to be exposed when doing container creation. When the container already running and new port need to be exposed, you're out of luck.

Goal

You want to expose new port which run by application inside a running container, so you can hit the docker-vm-ip:port to access the port on Mac OS X.

Assumptions

  • IP of Boot2Docker VM (Which run by Virtualbox) is 192.168.99.100
  • IP of the docker container running the application is 172.17.0.2
  • The application listen on address 0.0.0.0 and port 80

Share on Facebook Twitter

How to Create Root Certificate Authority (CA) and Self Signed Certificate

Tags: June 18, 2016 9:47 AM
0 comments

Goal

Make client application such as web browser to trust our self signed certificate, so we can use any custom domain in development or internal network.

Generate Root CA

The first is to generate private key for our Certificate Authority (CA). Command below will generate RSA based private key 2048 bits key size.

$ mkdir self-root-ca && cd self-root-ca
$ openssl genrsa -out myRootCA.key
Generating RSA private key, 2048 bit long modulus
.................+++
................+++
e is 65537 (0x10001)
$ chmod 0600 myRootCA.key

Command above will produce a file called myRootCA.key. The chmod command will make sure that only super user and the creator of the key able to read the file.

Share on Facebook Twitter

Custom Solution for Managing ssh-agent without Gnome Keyring

Tags: June 14, 2016 8:08 PM
0 comments

Goal

How to enter ssh private key password only once without having managed by Gnome Keyring. The ssh agent should remain detected every time new terminal spawned or even on tty console CTRL+ALT+F1 and so on.

Solutions

We will utilize ssh-add, ssh-agent and little bit shell script commands for achieving the goal.

Step 1

First start the authentication agent and redirect the result to a file so can gather the agent information later.
$ ssh-agent -s > /tmp/my-ssh-agent.sh
Execute the file so we have the correct environment variables needed by ssh-add.

Share on Facebook Twitter

Stop Gnome Keyring for Managing ssh-agent on Xubuntu

Tags: 6:35 PM
0 comments

Goal

Stop Gnome keyring for managing ssh-agent on Ubuntu so you can use the original OpenSSH ssh-agent implementation.

Quick Solution

The solution is quite easy because Gnome Keyring daemon provide a way to replace the existing session.
$ gnome-keyring-daemon --replace --daemonize --components=pkcs11,secrets,gpg
Command above will replace the existing Gnome Keyring daemon but it removes the ability to manage the ssh agent. You can execute command below to make sure Gnome keyring does not manage the ssh agent anymore.

Share on Facebook Twitter

Starting Ngrok Automatically at Boot Using Upstart

Tags: May 19, 2016 6:41 PM
0 comments

Goal

Expose SSH of the local machine to the internet using service provided by ngrok.com.

Steps

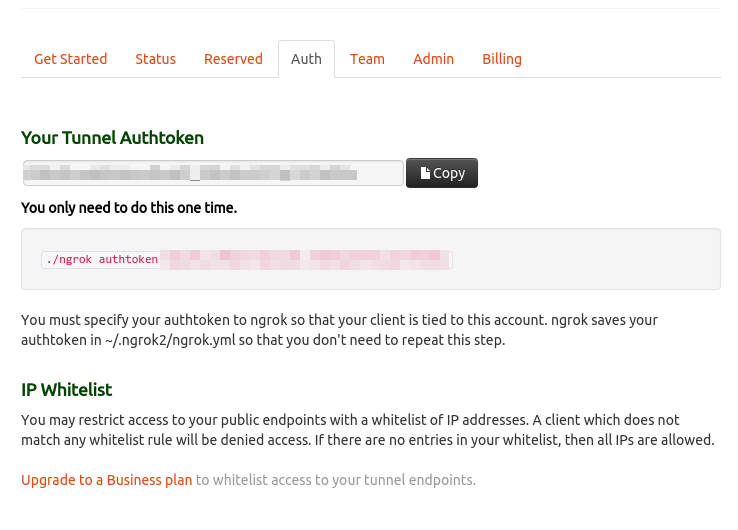
First thing first create an account at ngrok.com so we can get the Auth Token and also can monitor the tunnel created and know the address of the tunnel. Next is create a configurion file under ~/.ngrok2/ngrok.yml to store the token. You can get this token on your Ngrok dashboard.

$ cat > ~/.ngrok2/ngrok.yml
authtoken: YOUR_NGROK_TOKEN
Then create new file called ngrok.conf in /etc/init. Assuming the location of the ngrok binary is on /opt/ngrok/ngrok.

Share on Facebook Twitter

Simplify Multi-Hop SSH Connection Using Config

Tags: April 29, 2016 8:15 PM
0 comments

Goal

Using SSH config to simplify connecting to another host from a host a.k.a multi-hop connection. Diagram for the connection:
+---------------+
| Local Machine |
| 192.168.0.5   |
+---------------+
      |
      | SSH 
       \
       \/
+-------------------------------------+
| Host Machine 192.168.0.10           |
|           /          \              |
|          / -- SSH --  \             |
|  +--------------+  +-------------+  |
|  | Docker 1     |  | Docker 2    |  |
|  | 172.17.0.1   |  | 172.17.0.2  |  |
|  +--------------+  +-------------+  |
|                                     |
+-------------------------------------+

Share on Facebook Twitter

Configure Postfix to Relay to Amazon SES SMTP Server

Tags: April 27, 2016 6:55 AM
0 comments

Goal

Configure internal Postfix installation to relay email to Amazon SES SMTP server.

Steps

Make sure you have done everything that Amazon SES requires you before you're able to send email using Amazon SES. After that you can start to proceed steps below.

1. Install Postfix

$ sudo apt-get install postfix libsasl2-modules

2. Configure SMTP Credential

Make sure you already have Amazon SES username and secret key. Now we need to add the credential into postfix lookup table.
$ sudo cat > /etc/postfix/sasl_passwd
[email-smtp.us-east-1.amazonaws.com]:587 YOUR_USERNAME:YOUR_SECRET_KEY
$ sudo chmod 0600 /etc/postfix/sasl_passwd
You may change the smtp server email-smtp.us-east-1.amazonaws.com according region where you setup the Amazon SES. Now update the postfix lookup table.
$ sudo postmap /etc/postfix/sasl_passwd

Share on Facebook Twitter

How to Fix Multi-Hop SSH Forward Agent Issue

Tags: April 25, 2016 11:41 AM
0 comments

Problem

You want to connect to the 3rd SSH machine but using the key from the 1st hop not from your local machine. Here is the diagram:
+-----------------------+
|  Local Machine (LM)   |
+-----------------------+
            |
            |
+-------------------------+
|  Remote Machine 1 (RM1) | -> 1st Hop
+--------------------------+
            |
            |
+-------------------------+
|  Remote Machine 2 (RM2) | -> 2nd Hop  
+-------------------------+
            |
            |
+-------------------------+
|  Remote Machine 3 (RM3) | -> 3rd Hop
+-------------------------+
Commands listed below shown what issue we had with the forward agent.
user@local-machine~$ ssh -A remote-machine-1

user@remote-machine-1~$ ssh -A remote-machine-2
(Permission denied)
The authentication was fail because RM2 expect key from RM1 but which ssh agent sent was key from Local Machine.

Share on Facebook Twitter

Reset All Tables Except Migration Table on MySQL

Tags: April 15, 2016 9:29 PM
0 comments

Overview

When developing an application there is case when you need to clear all the data in your database e.g: testing the seeding or such. But you want to exclude some tables let say migration table which used by the application framework to migrate the schema.

Problem

You want to clean up data on all the tables, except the migration table because you don't want to re-run the schema migration.

Solution

  1. Get list of tables
  2. Exclude the migration table
  3. Append the prefix 'DELETE FROM ' to each line
  4. Append the suffix ';' to each line
  5. Pipe the result to MySQL
$ echo "SHOW TABLES;" | mysql -N DB_NAME | grep -v orb_migration | sed -e 's/^/DELETE FROM /' -e 's/$/;/' | mysql DB_NAME
In case above the table which excluded is orb_migration.

Share on Facebook Twitter